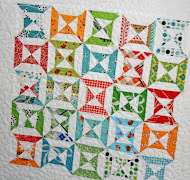
This is my first tutorial, and I'm so excited to be able to share with you how I came up with my method for the double hourglass block. When I was figuring this out, I used
Netties quilt as a guide. I'm not sure if this is the way that Nettie did her blocks, but she didn't mind me sharing with you the way I figured it out. THANKS Nettie!!
If you need, click on the pictures to enlarge them. I made mosaics to help show it in steps.

1. For one block, you need a 5 inch charm square in a pattern fabric, and then one 5 inch square in a white fabric.
2. Using a rotary cutter, cut a straight line from corner to corner. Do the same with the other corners.
3. Now you have 8 triangles. 4 of the pattern, and 4 of the white. You're are only using half of them for one block.
4. On my cutting mat, I used the 90 degree angle at the 6 inch point. If you measure down 2 inches, mine has a diagonal line there. This is where I used my rotary cutter and cut my triangles. So your cutting 2 inches off the top of your triangle. Do that with your pattern, and white triangles. If you have a triangular ruler, you can use that as well. I don't have one, so I just used my regular ruler.
5. Pair up your small triangles with the bottom part of the triangles. You should pair them up so you have one pattern and one white, that makes up one triangle.
6. Place right sides together on the straight middle line.

7. At this point, I sew a 1/8 inch seam. I use a 1/8 inch seam because it makes the triangles a little easier to manage for me, and when sewing in further steps, it makes it easier for the seams to not get in the way.
8. I sew them in a chain to help the process go a little faster. I'll even sew several blocks at a time.
9. Hold the small triangle...
10. and then press the seem towards the small triangle.
11. Trim the triangles.
12. Now you have 4 triangles, and you can see it starting to look like a double hourglass block.

13. Place right sides together.
14. I sew 1/4 inch seams from now on. Sew a 1/4inch seam, and I also sew them in a chain at this point too. Anything to save some time!! :)
15. Press seams to one side.
16. You're getting closer!
17. Place right sides together, and sew a 1/4 inch seam.
18. This is where I press the seam open, so it doesn't get too bulky on one side. I then use my scissors to trim off the little extras on each corner.

Yippee!! You just completed one block!! Go back and follow the directions to sew the rest of your blocks.
A few helpful tips when sewing your blocks together-
When I went to sew my blocks together, I didn't trim them. You can trim them if you would like to make them all the same size, and have them perfectly square. The reason I didn't, I was worried I would loose too much of the block with trimming.
I sewed my blocks together, and the rows didn't end up straight. I still didn't really trim at this point. When I was sewing the rows together is where I straighten everything up, so they came out straight. I'm not sure if this is what I should have done, but I was really worried about looseing too much with trimming. Any ideas, you're welcome to share.
For the white border, I cut 3 1/2 inch strips.
Please let me know if anything does not making sense. I really am new to quilting, so I'm not sure if this is the best way for making the blocks. But I just went with what worked best for me.




 I ironed a piece of kona cotton to some steam a seam and then ran it through my printer. I tried the freezer paper first, but didn't have any luck. It got stuck in my printer.
  Hope you have a wonderful Wednesday!!


