


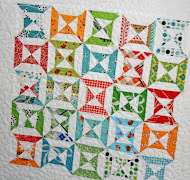


Thanks so much for all your sweet words on the simple patchwork and stars quilt! I'm excited to share the tutorial with you! I've had several people ask if I followed a pattern, but this is something I drew out on paper and then made the quilt. I didn't follow a pattern. :) So here is how I made the quilt and what you'll need~
Rotary Cutter, Ruler and Mat
Fat Quarter Bundle of The Simple Life, by Tasha Noel for Riley Blake
1/2 yard of Red, Pink and Aqua solids
1/4 yard of white solid (for border)
3/4 yard of Simple Floral in Aqua (for border)
1/2 yard of Simple Gingham in Red (for binding)
Batting
Backing fabric
The finished size measures 51 1/2 X 60 inches.


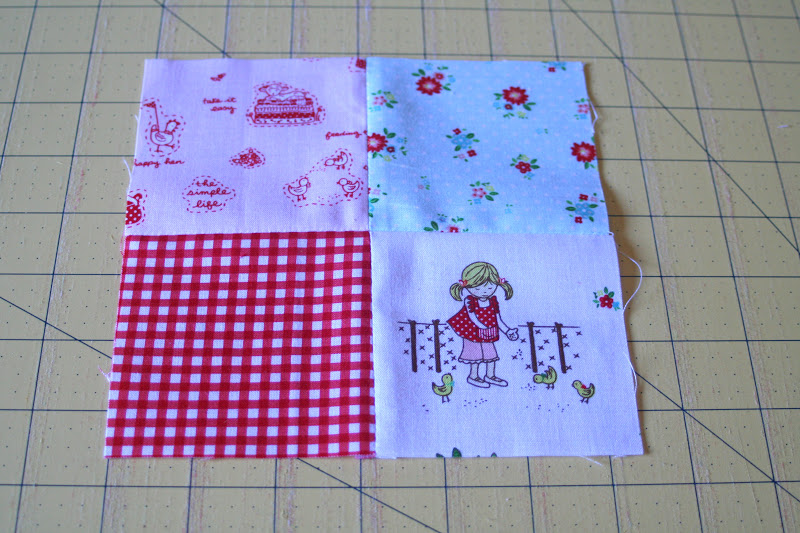
Lets now make our first block. Stitch 4 squares together.


Now continue as above and stitch the other side.


Stitch your top to pieces together.


Continue making your blocks.

Keep going! :)


Yeah, the quilt top is done!
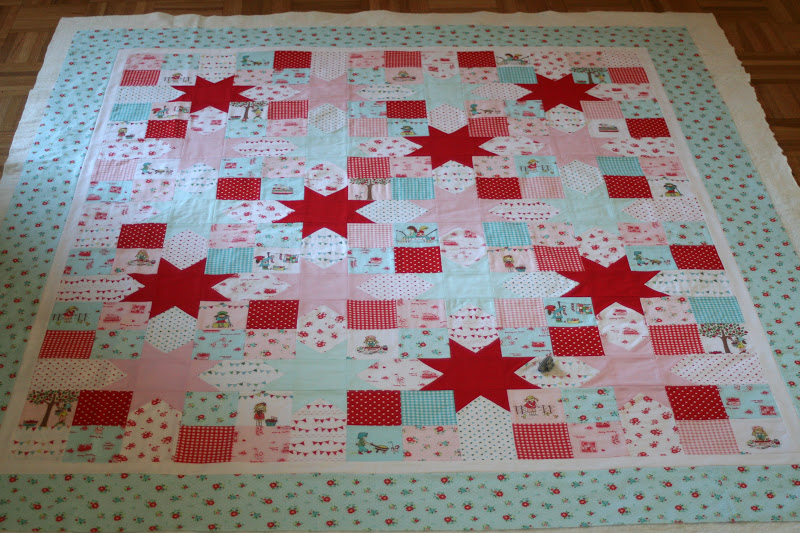
Now all you have left is to add a 1 1/2 inch white border, your 5 1/2 inch border, then sandwich, quilt and bind your quilt!!

Isn't that fun and easy! I hope you enjoyed the tutorial!

Happy Halloween, my friends!


Well done!
ReplyDeleteThank you! I pinned it for future reference!
ReplyDeleteThis is beautiful! Thank you so much for the tutorial.
ReplyDeleteI actually made a similar quilt from a book but the way you have shown it looks a lot easier! The one I did had me do the 4-patches and then the other parts were done as sashing rather than part of the block. I think I'll do another using your method. thanks for the tutorial!
ReplyDeleteI didn't know there was something similar in a book. Which book? I'd love to check out their method. :)
DeleteI pinned you! :) Great tutorial and pretty quilt. I love patchwork and stars.
ReplyDeleteThanks for sharing. In the cutting instructions, is 7 3 1/2 inch squares? Your quilt is beautiful!
ReplyDeleteYes, you cut 7, 3 1/2 inch squares for the red and the pink stars. They are the center squares. :)
DeleteI will be making this for sure! What is the finished size? Thanks for sharing your tutorial-
ReplyDeleteI forgot to measure it before it went to market, I'll post the finished size once I get it back. :)
DeleteGreat! I'll try this :D
ReplyDeleteLove this! I am working on a Radiant Ring quilt right now in the same colors, with the Simple Life print fussy-cut for my centers. Unfortunately, they're 4.5" square which is just a little too big for the print -- I end up losing a lot of the motifs. But I just bought more and cut the ones I like best. :) Thanks for the lovely inspiration -- the colors are amazing -- now I can't wait to get mine finished!
ReplyDeleteKerri, I just love this quilt!! Thank you for sharing how to make this pretty quilt! Happy Halloween! xo Heather
ReplyDeleteThis is such a beautiful quilt and a wonderful tutorial! Just wanted to say too that my parcel of Simple Life fabrics from you has arrived safely across the pond! Thank you so much, Kerri, they are gorgeous!
ReplyDeleteHappy November!
Helen x
I absolutely love this! How wonderful would it be in Christmas colors!
ReplyDeleteI'll email you. For future reference, the best way to contact me is through the etsy convo feature. Also, you can email me at sewdeerlyloved@hotmail.com. Though sometimes my email gets a bit backed up.
ReplyDeleteThis is so lovely!!! Thank you for sharing:-)
ReplyDeleteVery lovely! I want to try this :D
ReplyDeleteLove this quilt, thanks so much for the tutorial!
ReplyDeleteThis is so sweet! Thanks for the tutorial :)
ReplyDeleteWow, Kerri, you are brilliant! I love, love, love this quilt. Thank you so much for the tutorial, I will be making this for sure!
ReplyDeleteOh Kerri, I received those darling prints (that I won in your last giveaway). They are THE cutest things! I am so overwhelmed by them. They are by far the best thing I have ever won... EVER! I feel so very blessed. I can NOT wait to use them, but am having a hard time coming up with something "worthy" of them! lol As soon as I do, I will definitely post on flickr and send you pics. Thank you soooo very much!
ReplyDeleteBTW, the other fabrics that I ordered with them were delightful as well. Those Simple Life prints are even better in person than in the pics, and that is saying A LOT. I almost wish I would have ordered full yard cuts (especially after seeing Tasha's latest post). If only I were a millionaire...
They are looking so beautiful. Patchwork is my favourite. I will do this for table mats.
ReplyDeleteKerri, your quilt is so gorgeous! I love every single thing about it, and your wonderful tutorial too. Just lovely!
ReplyDeleteque hermoso
ReplyDeleteThis quilt is gorgeous and would be perfect for my daughter's room ! Thanks for the tutorial :)
ReplyDeleteI have some questions though : which quantity of fat quarter do I need exactly ? If I buy the bunde of 18, will I have some leftovers ?
Thanks again for your time and your wonderful inspiration !
Thanks!!
DeleteIt is the 18 fat quarters. There will be some leftovers too. :)
BEAUTIFUL QUILT-LOVE THESE FABRICS!
ReplyDeleteTHANKS FOR SHARING!
msstitcher1948@yahoo.com
A beautiful quilt!
ReplyDeleteGreat Tutorial and such a beautiful quilt! Do you know the finished size? I would like to make a lap quilt for my mother using your tutorial but can't seem to find what's the size.
ReplyDeleteThanks for your help and for sharing so much!
Great Tutorial and such a beautiful quilt! Do you know the finished size? I would like to make a lap quilt for my mother using your tutorial but can't seem to find what's the size.
ReplyDeleteThanks for your help and for sharing so much!
Sorry to just be answering your question. The quilt measures 51 1/2 X 60 inches. :)
DeleteI'd love to know the finished size as well.
ReplyDeleteAlso can you say specifically what you used for your red, pink and aqua.
Thanks! This quilt is seriously so cute!
Sorry to just be answering your question. The quilt measures 51 1/2 X 60 inches. :)
DeleteLove this quilt and I just bought the fat quarter bundle from you. Would like to look for the red, pink and aqua online as well. Do you know what colors/ brand you used for those? Thanks!!
ReplyDeleteHi Kelly,
DeleteFor the solids I used Riley Blake solids. :) I think the colors are:
Pepper (red)
Bleached Denim (light aqua)
Pale Pink
Clean White
Tasha had given them to me so I'm not 100% sure, but from the website I'm pretty sure those are the colors. :)
Love the quilt & the tut! Thank you very much. I am going to teach a friend to make this quilt as a 50th wedding anniv present for her parents. Using layer cakes and charms from the Tapestry collection. I am thinking she will need to trim the layer cakes down to 8.5 to have the charms used for the points. Your pics motivate me!
ReplyDeleteJust purchased the bundle. So excited to make this quilt!
ReplyDeleteWhat a happy Quilt, thanks SEW much for this tutorial and ALL you do
ReplyDeleteUuuuaaaaauuuu!!!!!!!!! I love this quilt!!!!!!!! Is wonderful!!!!!!
ReplyDeleteAnna
I would love to have these patchwork quilts for my bed. Because I just love your post. what say????
ReplyDeleteBeautiful!!! This is the best pattern ever for stars. Thanks for sharing!
ReplyDeleteIm a patchwork noob but have saved fabric from my daughters dresses and want to make her a quilt as beautiful as this before she leaves home. how do i know if i have enough fabric of each type?Any help welcome!
ReplyDelete