


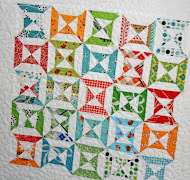


 Using the cute pinwheels I bordered sweet little Polly Pinwheels, and am now working on a frame so I can have her all ready for my daughters birthday. I'll show you when she is all finished and framed. :)
 To make the pinwheels, I used a simple method, that is so quick and easy!! Here is a quick little tutorial on how I made them~
Cut 2, two and a half inch squares.
(it would be really quick and easy to use charm squares or a layer cake if you want a larger pinwheel for a quilt.)
the pinwheel will end up the size that you cut your squares so you can cut any size you want!! :)
(it would be really quick and easy to use charm squares or a layer cake if you want a larger pinwheel for a quilt.)
the pinwheel will end up the size that you cut your squares so you can cut any size you want!! :)

place right sides together and pin.

sew a 1/4 inch scant around the entire block.

cut with your rotary cutter and ruler diagonally from corner to corner, to create four triangles.

press seams open and then trim each corner

arrange your blocks to make a pinwheel and then sew all four blocks together.

sew the rest of your blocks using the method above. each block ended up 2 1/2 inch square! i told you, isn't that super easy!?! :)

the finished polly pinwheel block!!

Yesterday I also received Annie's Farm Stand!! I used a few of them for the pinwheels, and am already in LOVE with this lovely collection!! I even have a few more still coming so keep a look out!!

Better get back to more party planning as I only have till Saturday!!


ooh, thanks for the tute... I think I'll try it that way next time I make some pinwheels.
ReplyDeleteAdorable!
ReplyDeleteThis is so cute! I love the shot of the back. I saw that new stack of fabric in your shop this morning. It's beautiful!
ReplyDeleteTotally cute!!! I love your mini quilt, your daughter will be so surprised!
ReplyDeleteI love making mini quilts, I think I might give this one a go!
Thanks for sharing!
Chris :o)
How perfect! And I love that new fabric!
ReplyDeleteThis sounds a great way to make pinwheels!
ReplyDeleteThanks!
Love your pinwheels. I actually just learned that trick yesterday. Also I just purchased Annie's Farm Stand and absolutely love the fabric. It is so beautiful.
ReplyDeleteaww it looks really pretty ;-) Thank you for showing how to make them i may have a go at this one later in the year, dee x
ReplyDeletegorgeous quilt top and great idea on how to make pinwheels!
ReplyDeleteGreat tutorial, that makes it so easy!, thanks! I saw the new fabric in your shop this morning and it's so cute!!!
ReplyDeletei love the little pinwheels! and what a great tutorial for a new way to make them...i'll definitely try this. the annie's farm stand looks soooo cute!
ReplyDeleteGreat tutorial!!! Thank you very much.
ReplyDeleteThanks for tutorial! Your little quilt is so sweet; love the way the pinwheels border the little girl.
ReplyDeleteOh, and I really like the colors in the fabric collection!
Such a darling little quilt. Love the tutorial. I will have to making some pinwheels!!! Thanks for the inspiration.
ReplyDeleteGorgeous little quilt, great tutorial will be making lots of pinwheels from now on :)
ReplyDeleteKaren
Thanks for the tutorial, you've made it look so simple I think I will have a go!
ReplyDeleteHi Kerri,
ReplyDeleteI’m one of the Editors at AllFreeSewing.com and I just wanted to let you know I have linked to your project on our site.
Here's the link:
Adorable Pinwheel Quilt
If you have any questions or would like to see more of your projects on our site, please feel free to contact me.
Thanks!
Hannah
Editor
AllFreeSewing.com
Adorable pinwheel mini! I shared one of mine recently. A favorite pattern of mine is the pinwheel! So cheery!
ReplyDeletegreat tutorial, thanks
ReplyDeleteTHANK YOU! I have never seen half-square triangles made this way before, and I can't wait to try it out! It looks so simple, and I am hoping they don't need squared up!
ReplyDeleteMrs.Hearts
www.busyhandsquilts.blogspot.com
OMG love this method, thanks for the tip:)
ReplyDeleteAs a beginner quilter, I find your tutorials very easy to follow. I look forward to seeing more of your delightful work.
ReplyDeleteattempting to make my first quilt!!!!! so far there has been no injuries..lol I did like this tutorial..you made it very easy to follow ..but m I do need some instruction on how to do the backing and edges,,,will you be doing this anytim soo?
ReplyDeletethank you
Do you have a pattern for the girl with the pinwheels that centers the quilt?
ReplyDeletePolly Pinwheels is a design my friend Ariel did. I use to have her in my shop but need to re-order soon. :)
DeleteThanks so much! I am very new to quilting and see this as a block I can make to start out. Thanks for sharing, well explained.
ReplyDeletecute!!!
ReplyDeleteFabuloso tutorial. Muchas gracias.
ReplyDeleteThank you so much for writing this up! I have even done it this way before, but can't remember it when I need it. Now, it's "Pinned".
ReplyDelete