I'm so excited to finally be able to share this amazing technique on how I made the folded stars. Please know right off this is not my pattern, and the tutorial is to show you how easy it is to use the template to make them. I received permission by
Plum Easy to give instructions on my blog. For the
full pattern and
template with cutting instructions just visit my
shop.
Here is what you need~
Plum Easy Folded Star Pattern and Template (the pattern comes with 1 template, and you can also get packs of 3 templates)
1 small square
4 small dark colored squares turned into prairie points
8 large light colored squares turned into prairie points
8 large dark colored squares turned into prairie points
8 large light colored squares turned into prairie points
glue stick
rotary cutter and ruler
steam iron (for making the prairie points)
To make the prairie points fold it in half once, wrong sides together and press. Then fold the two corners to the middle and press with steam so it stays in place.
Add a little glue to the wrong side of small square and place in the middle square section of he pattern.
Add a little glue to the back side corner of the small prairie point.
Set in place in between the 45% angle lines (you can move and adjust if you need).
Continue with the 3 other small prairie points by adding glue to the back side corners and then setting in place.
Now for layer number 2. Add some glue on the back side of one of your light large prairie points.
Place the first one on the layer 2 line on the 45 degree angle line.
Add some glue to the second prairie point and place it on the layer 2 line and the 90 degree angle line.
Continue adding glue to the corners of your prairie points and place around the circle as pictured above.
For Layer number 3, start in the same place as you did with layer number 2 and continue going around the circle adding all the prairie points.
Add layer number 4 the same way you added layer number 2 and 3.
After you have all your layers in place take it over to the machine and top stitch by stitching in the ditch.
Top stitch each section of your 8 points.
Use 4 scrap triangles larger than the corners and stitch right sides together. Then iron seams to one side as it is really thick.
Trim up your block with your rotary cutter and ruler and then you are all done!! You can now make that into a potholder or keep going and make a pillow. :)
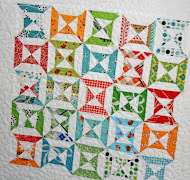
My 4 folded stars.
All done with my pretty pillow!! Yeah!!
I added Annie's Farm Stand, Seed Catalogue for a border, some yellow crochet trim, and Annie's Farm Stand
Mini Rosie for the binding.
The back, Atusko Matsuyama's
Spring Bouquets in pink & Tasha's, Little Red Riding Hoods
Stripe in Red.
I quilted the pillow by top stitching around each star. This is one thick and comfy pillow! :)
I hope everyone is having a lovely Spring week!! We've had the most lovely weather and have really been enjoying it!! :)


.JPG)


.JPG)


precioso !!! es la misma técnica que se usa para forrar bolas de telgopor, la única diferencia es que se coloca un alfiler en cada extremo del triangulo para sujetarlo, pero nunca pensé que quedara tan bonito así !!!
ReplyDeletegracias por el tutorial !! :)
Wow, what a gorgeous pillow! Thank you for the tutorial. :)
ReplyDeleteThanks!! So interesting can't wait to try it!
ReplyDeleteThat looks wonderful in those fabrics.
ReplyDeleteThe printed interfacing will make this a breeze. 30 yrs ago I used a compass to make tons of these as pillows, potholders, wall quilts, etc for craft fairs. What was old is new, again!
ReplyDeleteThank you so much!!!!! I can't wait to try this out - I am so grateful for your time...I've been looking forward to your tutorial so much. You're so good at what you do..,,,,
ReplyDeleteSo beautiful and sweet!! Thanks for sharing how to make them!! Love all the pretty prints!! Have a great week! xo Heather
ReplyDeleteIt's lovely to see traditional Somerset Patchwork designs updated.
ReplyDeleteJust wow
ReplyDeleteJust wow
ReplyDeleteThat's lovely. The colours are so pretty. What a brilliant effect :)
ReplyDeleteA truly beautiful pillow and so beautifully made. Wonderful tutorial!
ReplyDeletexoRobin
This is gorgeous! The technique reminds me of the fabric Christmas ornaments I made as a child. Too fun!
ReplyDeleteSO NEAT! THANK YOU SO MUCH FOR THIS TUTORIAL!
ReplyDeleteNEAT IDEAS FOR GIFTS!
HAPPY STITCHING!
msstitcher1948@yahoo.com
Wow, that one fancy pillow...beautifully made and delicious fabrics.
ReplyDeleteI'm having trouble finding the template in your shop. Am I not looking in the right place? Any help you can give me in locating it would be appreciated. Thanks,
ReplyDeleteLinda
I was thinking I was sold out but looked again and have a couple left. :) I just relisted the templates and the pattern.
DeleteThis comment has been removed by a blog administrator.
ReplyDeleteThank you for sharing!! I absolutely love it!!!
ReplyDeleteStunning pillow design, and wonderful tutorial! Your work is amazing, Kerri and so neat! Love the gorgeous fabrics you used too!
ReplyDeleteWishing you a happy week.
Helen x
Thank you so much for the tutorial. I'll be making some folded stars myself now! Have a wonderful week~
ReplyDeleteThank You Very Much, Kerri!
ReplyDeleteYou did a beautiful job, and i was just getting into the folded stars from a pattern book i had used in the '80's with my Grandmother who was teaching me to sew--great memories, and yours are beautiful!
That looks like so much fun! And what a great tutorial, I will have to try that one out for my self.
ReplyDeleteSo much for the tute! I especially love your color and fabric choices. It's so cute! :-)
ReplyDeleteI have maybe a dumb question. Why is the folded part of the Prairie square facing up instead of the flat part?
MUCHAS GRACIAS, ESTUVE BUSCANDO DURANTE MUCHO TIEMPO ESTE TUTORIAL DE PRAIRIE POINTS. SO MUCH FOR THE TUTE.I'M FROM ARGENTINE-TUCUMAN.MAIL perezdeinigo@hotmail.com.ar.CONGRATULACION .THANK YOU VERY MUCH.
ReplyDeleteI love this what a great idea
ReplyDeleteBeautiful - LOVE the pillow. I just rec'd my templates & pattern (I was going to make their table runner) to give this a try & voila' you present a wonderful tutorial! What awesome timing :) After I get through hubby's surgery Monday, I'm gonna give this a try! Thanks for your tutorial, very nice.
ReplyDeleteJe vais essayer la méthode pour coudre les triangles du coussin.Merci pour le tuto.
ReplyDeleteEs lindisimo Gracias por compartir este trabajo con nosotros. Queda hermoso.
ReplyDeleteThank you for the tutorial! Such a beautiful pillow. I want to make one for my father in blues. thanks again!
ReplyDeleteThanks for the tutorial. Could you tell me what "small" and "large" are? Looks like a fun pattern.
ReplyDeleteThe exact measurements of the squares are in the pattern. Since this isn't my pattern I'm not able to share that, just how to use the templates. :)
DeleteПрекрасная подушка! Нравится всё.
ReplyDeletethank you so much - I have inherited a 1/2 made folded star wall hanging and I'm unsure on how to finish it. There is a matching ruffle and hoop. Do you have any ideas? Thank you so much for your time. - Loree in Edmonton, Alberta
ReplyDeleteThank you for the tutorial. :)
ReplyDeleteTrabalho maravilhoso!
ReplyDeleteMy hat is off to you, my husband passed away but was very supportive of my love for quilting, I didn't have six kids, but started quilting just before he passed. God Bless you & thank God you have a wonderful husband. I think you will go far.
ReplyDeleteBrilliant thank you for your timd and trouble one happy lady x
ReplyDeletehi just to say this tutorial is fantastic thank you so much
ReplyDelete