Its been a little crazy lately. I was hoping to post last week but life got too busy. Thanks for being so patient in waiting for the tutorial! You're the best!! :)
Here is what you need~
Rotary cutter
20 coordinating 1 1/2 inch strips x the width of the fabric
60 degree triangle (I got mine at Joanns and used my 40% off coupon)
Pins
Quilting ruler
Ruffle elastic lace and crochet trim (optional)
2 Coordinating backing fabrics for pillow
Batting
Cut and pair up your 1 1/2 inch strips. Start with your first pair and then place the strips right sides together and stitch a 1/4 inch seam.
Press seams. Line up your triangle over the strip and then cut your first triangle. After your first triangle is cut, flip the triangle the other direction and then cut the second triangle. Continue until you have 12 triangles cut.
Your 12 triangles will make 2 hexagons as pictured above. Continue stitching the rest of your paired strips together and then cutting the triangles.
Arrange all your 20 hexagons.
Start with your first hexagon. We are stitching the hexagons in halfs, not stitching each hexagon together. You'll see why later. Place triangle 1 and 2 right sides together from the 3 triangles of your half hexagon and pin at the seam. Stitch a 1/4 inch seam and then press. Continue stitching the 3rd triangle to your half hexagon, then press. Trim the corners.
Continue stitching each half hexagon.
Place all your half hexagons so they are in rows. We are going to stitch the rows together.
Pin your first two half hexagons together. Look closely at the picture
as there is a little of overlapping at the top. Also the pressed
seam from the top half hexagon matches up with the bottom of the under
side half hexagon. Stitch a 1/4 inch seam and then press seams.
Continue stitching your first row together and then trim the edges where the little triangles and thread are.
See how your first row looks. So pretty!
Continue stitching each row together.
Pin row 1 and two right sides together at the points of each half hexagon. Stitch a 1/4 inch seam.
Press seams.
Continue stitching all the rows together. Now with your rotary cutter and ruler trim the hexagons to square them up.
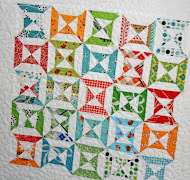
Oh sew lovely!!
I added a 1 1/2 inch border so it would be an 18 inch pillow.
Sandwich and quilt the top.
For a ruffle border I stitched it on before I stitched the back on.
Then I added some pink crochet trim to the top half of the envelope backing and then stitched them on right sides together and turned it out. Now my pillow is all done! Yippee!! :)
Look, my red polka dot jeans match the pillow! Hee Hee! ;)
I think this is my favorite trim right now!! ♥ it!! Do you have a favorite trim? I'd love for you to share!
I hope you are having a lovely week!


Thanks for the tutorial.
ReplyDeleteAle
Costa Rica
Adorable pillow and great tutorial! Thanks Kerri!
ReplyDeleteKerri this is lovely!!
ReplyDeleteThis is so so darling! I love it!! Thanks for such a great tutorial!!
ReplyDeleteSo beautiful Kerri, and all your prints are so pretty! Thanks for a great tutorial!! Have a lovely day! xo Heather
ReplyDeleteThis is so beautiful!! Thanks for sharing the how to! :) Have a great day! xo Holly
ReplyDeleteLove it! Great tutorial.
ReplyDeleteThanks for beautiful tutorial!!
ReplyDeleteThe lace is the perfect touch! I pinned this for future reference!
ReplyDeleteSo lovely!
ReplyDeleteI love this! The colors are so perfect!
ReplyDeletePom poms in any color are my favorite trim but I like yours, too! ♥
Adorable happy pillow! Thanks for the tuto!
ReplyDeletesoo cute, I love all the fabric you used and the trim is just the perfect added touch!!
ReplyDeleteThis is truly lovely! I do love that trim, and my favorite trims are any of the crocheted lace or ric rac. Thank you for sharing a tutorial, can't wait to give it a go.
ReplyDeleteIt's a beautiful pillow, the trim finishes it up perfectly! Thanks for the great tutorial :)
ReplyDeleteLove your pillow! Thanks for the tutorial :) Oh, and I love little mini pom poms for trim, they make everything look so cute :)
ReplyDeleteKerri, I love this so much I have that sick yearning in the pit of my gut! I am hoping and praying that it shows up in my mail box. Seriously you have no idea how much I love this!
ReplyDeleteLove this pillow and the tutorial is great, very straightforward and easy to follow. The colours are perfect. Thank you :)
ReplyDeleteWow, thats beautiful.
ReplyDeleteJust the thought of getting all those seams to match up is giving me a headache.
One day though l may be able to :)
I am impressed that you have time to sew anything with 6 kids!
ReplyDeleteThanks for this lovely tutorial, Kerry!
ReplyDeleteI think this might be my favorite thing you have ever made! Thanks so much for doing a tute!
ReplyDeleteLove this one...I now have a plan for this weekend!
ReplyDeleteThis is beautiful!! LOVE the instructions!!! I want to make one now! :)
ReplyDeleteGorgeous cushion i love the colours and patterns xxx
ReplyDeleteBEAUTIFUL!!!! thank you for the tutorial!!!
ReplyDeleteKerri, your new pillow is adorable!!! Thank you for sharing sooo lovely tutorial! :-) Have a nice weekend, Jolana
ReplyDeleteThanks for the tutorial I'm going to give it a try. :)
ReplyDeleteI love the design. Thank you for such a good tutorial! my favorite trims are ribbon.
ReplyDeleteExcellent site you have here but I was wanting to know if you
ReplyDeleteknew of any community forums that cover the same topics discussed in
this article? I'd really like to be a part of group where I can get feedback from other knowledgeable individuals that share the same interest. If you have any recommendations, please let me know. Kudos!
Here is my webpage ... How Many Calories In Grapes
That turned out pretty great! :)
ReplyDeleteThank you for a great tutorial
ReplyDeleteFound your blog through Lilly's Quilts and love it! Everything here is wonderful ~ and thanks for this sweet tutorial. I'm becoming a follower!
ReplyDeleteHi, thank you for your tutorials:-)
ReplyDeleteA big hug from Italy, Emanuela
thanks for the easy way to do hexagons now i will have a go at them and let you know how i get on
ReplyDeleteMuito lindo!!
ReplyDeleteA sweet and delightful tutorial.
ReplyDeleteLindíssimo.....
ReplyDeleteThank you so much. I think I may finally try hexies. This seems doable. cute fabric choice.
ReplyDeletewhat a great idea ,quick and effective . Thanks for sharing
ReplyDeleteBeautiful pillow and wonderful technique! I would like to know if the 12 triangles take up the entire strip (WOF)? If not, how long a strip is needed? Thanks!
ReplyDeleteHi Lorraine,
DeleteThere are 3 triangles per half hexagon so that would be 15 triangles per row. :)
Now I know what to do with all my collected ginghams! Thanks for the tutorial, makes hexagons so easy!
ReplyDeletegorgeous and inspiring
ReplyDeletehermoso,......
ReplyDeleteSeus tutoriais são muto bem explicados. Parabéns!!
ReplyDeleteFica fácil entender como formar esses projetos lindos!
Obrigada.
En ole koskaan tykännyt kuusi kulmaisista, mutta tämä voisi olla kiva kokeilla
ReplyDeletePrecioso,sencillo y sobretodo muy alegre.Gracias comparto contigo esos colores y en cuanto pueda lo hago.Un beso.
ReplyDeleteDoes it work just as well with wider strips of fabric? Say 2 1/2 or 3 inches? Any tips on making it larger?
ReplyDeleteYes, you could cut wider strips and it would make it larger. I haven't made a larger one yet but it would work. :)
DeleteSo pretty! I think one of these might need to be made to match my new quilt in my bedroom - thanks for the ideas!
ReplyDeleteKerri, Great tutorial! I wanted to pin it but there is not Pin it button on the post. I tried your Pinterest button but it didn't work either.
ReplyDeleteLove this!!!
ReplyDeleteThanks for the tutorial. You made it so easy to understand. How simple and clever! Thanks for sharing.
ReplyDeleteI know I'm late to the party, but. .. this looks totally doable. I bet I could sew a quilt!
ReplyDelete