


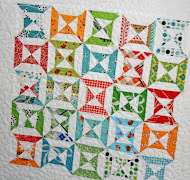


Thanks for all the sweet comments on the quilt top in my last post!! I truly love hearing from you, and thanks for being so patient for the tutorial! Are you ready to see how I made it!?!... Here is what you'll need~

Rotary Blade & Ruler
Scissors
Pins
3 charm packs
Red (32), aqua (32), pink (28) and white (28) solid fabric, 5 X 5 inch squares
3/4 yard small border fabric
1 yard large border fabric
3/4 yard binding fabric
Rotating cutting mat (optional)
Finished size, approx. 62 X 72
Let's get started!

Take one of your charm squares and cut it in half.

This is where the rotating cutting mat is really helpful. Turn your mat and then cut it in half again so you have 4, 2 1/2 inch squares.

Keep going till you have all your charm squares that you want to use cut.

Pick out 8 small squares, and 4 solid red squares. Then press your small squares in half so the points touch. Press the rest of your 8 squares.

Place two of them on one square. You can pin them if you want or just place them there.

Place your other pressed small squares on your 3 other red squares. Now stitch on the pressed lines.

With your rotary cutter and ruler trim your corners so you have a 1/4 inch seam.


Press seams, I like to press mine open. Continue with your other 3 blocks.

Here is your first block. :)

Stitch your block together

A little tip...if you pin your points it will help get them perfect. :)

Continue stitching all your blocks like above until you have them all done. Do half in an O shape and half in an X shape.

Layout all your blocks.

Then add your sashing. Smaller ones are 2 X 9 1/2. The longer ones are 2 X a little longer than the length of the row. Then I trim it after.

Continue with your sashing and then add your border. The large border is 4 1/2 inches wide. Then all you have left is to sandwich, quilt and bind your quilt! :)

Yippee!! Wasn't that easy!!

For the quilting I did the dogwood pattern. This was the first time I did a different free motion quilting pattern other than stippling. I'm happy with how it turned out for my first time. Definatley want to work at it and get better.

For the backing I used a pretty pink and aqua rose vintage sheet. I think it was perfect for the quilt.
So you want to see a few of the pictures I took of the twins? Another thing I really love is taking pictures of infants so I hope you don't mind me sharing. They are so adorable and sweet!! :)

Maybe in another post I'll show you a few more. :)


I can't wait to see them again this week!! I could sit and hold them all day long!
I hope you have a lovely Valentines week!!


The quilt is lovely, but those wee ones are just gorgeous!!! So much to love.
ReplyDeleteThank you so much for the tutorial. What a cute quilt! And is there anything more beautiful than newborn babies? So sweet.
ReplyDeleteMuchas gracias, me ha encantado el tutorial
ReplyDeleteThank you so much for sharing the tutorial!! And congratulations on the new family members, adorable!
ReplyDeleteI absolutely love your quilt! Enjoy those babies! ♥
ReplyDeleteThose babies are just precious! Lovely quilt for those sweethearts. :)
ReplyDeleteAhhhhhhh!!!! I don't know what I think is more adorable... The quilt or those BABIES!!!! Congratulations on your new additions to the family! That was so nice to help your sister-in-law out. Thank you for the tutorial!!!
ReplyDeleteThis comment has been removed by a blog administrator.
ReplyDeleteSuch a sweet and pretty quilt! And cute babies! :) Happy new week! xo Holly
ReplyDeleteHi Hildy,
ReplyDeleteI'm not sure how your comment got deleted, as I didn't delete it. I'm so sorry about that. I checked my email and your comment was in there. Here is what it said~
"Thanks for the tutorial!
The twins are sooo cute enjoy your time with them! Hildy"
lovely quilt of course, but the twins are adorable!
ReplyDeleteSo cute! Thank you so much for showing us these pictures. You are so talented! Nicolexxx
ReplyDeleteThanks for the tutorial. It's perfect for a baby quilt that I need to get done in the next week or so. A friend is welcoming a new addition to her all male family and this time it's a girl so this is perfect. The twins are precious.
ReplyDeleteA beautiful and sweet quilt!! Thanks for sharing such a great tutorial!! How precious are these babies and adorable photos!! Such little blessings! Have a lovely week Kerri! xo Heather
ReplyDeleteGreat tutorial, thank you! I had never seen that design before you shared your quilt. The twins are beautiful! My younger sisters are twins, almost 32 years old now, but twins are always interesting to me. :)
ReplyDeleteThe tutorial is great and the quilt is lovely, but not as gorgeous as those beautiful twins! I love babies and baby portraits too. They look beautiful. Enjoy!
ReplyDeleteSuch beautiful baby photos, congratulations on the sweet new additions to your family. And thanks for finding the time to do the great quilt tutorial. :)
ReplyDeleteHurray!! I love this quilt. Thank you so much for posting the tutorial. And what absolutely adorable twins. Congrats!! :)
ReplyDeleteCan't wait to try this quilt pattern. :)
Thanks for the tutorial!
ReplyDeleteI thought those were pictures taken from magazines! Such cute babies and great pics! Congrats!
Oh those adorable new babies!! Wonderful pictures of them together...really special! Love your quilt too and the tutorial is excellent, Kerri!
ReplyDeleteHelen x
The quilt is great and thank you for taking the time to do the tutorial! Much appreciated! Congratulations on the new additions!
ReplyDeleteI love your works they are beautiful, congratulation to you
ReplyDeletebye
Josefina
tijerasycuchara.wordpress.com